Introduction
Several years ago I discovered cross stitch. I had always been interested in needlework and crafts from a very young age but this was my first adventure into embroidery. As soon as I began I was addicted. It took over my days and, through troubled times, even my nights! When I had the opportunity to study for a teaching diploma, craft, including cross stitch, was my chosen subject.
I found beginners were given few instructions in kits, so printed my own instruction sheets to use in my classes. I hope this helps the beginner understand the basics of cross stitch and inspires them to do more stitching.
History
Cross stitch is one of the oldest embroidery stitches and can be seen on many articles such as clothing and household items throughout the world. Although it is simple in its form it can be used to create many beautiful designs and has been worked in all cultures from China to Mexico.
It is possible that the designs may have come originally from Persia and taken to China by travellers along the Silk Route during the T’ang Dynasty. It is thought the Crusaders were responsible for the introduction of embroidery to Europe and, therefore, the cross stitch designs arrived about the same time.
In the18th and 19th centuries it was popular, especially for children, to stitch a sampler and was a simple way to teach embroidery, spelling, and geography when maps were incorporated into the design. In this way it was possible to keep a reference collection of embroidery stitches and designs which may otherwise have been lost. Today we make samplers for different occasions such as weddings and birthdays which relate particularly to the person or event.
Fabric
Any fabric used for cross stitch must have an even weave so the stitches will be uniform (equal number of threads per inch). This number is called the count. It must also be easy to count the threads or squares.
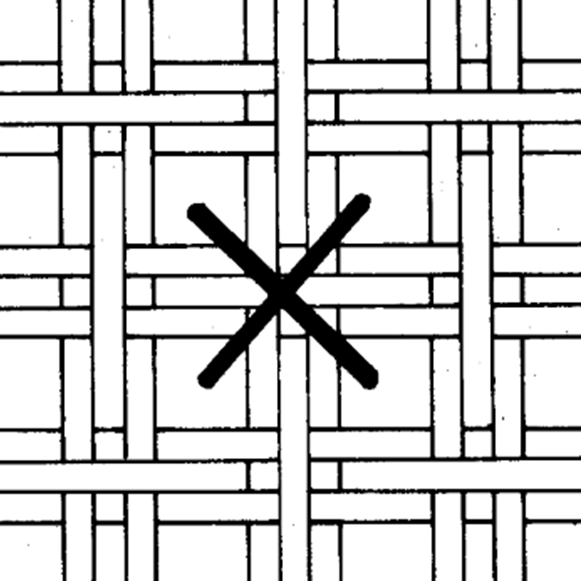
The most popular fabric for the beginner is Aida or Hardanger, both of which have definite squares in the weave (see fig. 1). There is also an Aida fabric with the inches marked in a coloured thread to make counting easier. Binca is similar to Aida but has a larger thread count and, therefore, easier for children to work on.
Even weave linen is also suitable and particularly useful for very fine work. Whole stitches are worked over two threads (see fig. 2). As you become more proficient you will probably prefer to use linen or even weave fabric. For the adventurous with good eyesight, silk gauze can be used with a stitch count of up to 40. The size of the weave determines the size of the finished design.
It is also possible to use a canvas with removable threads so that designs can be worked on items with an uneven weave, this is called waste canvas and generally has a count of 14. Tack a piece of waste canvas onto the right side of the fabric you wish to embroider. Work the cross stitch design over the canvas grid. When you have finished stitching your design, cut away any excess canvas and dampen slightly to soften the threads and gently pull out each thread of the waste canvas with tweezers.

Fig. 1 – Aida Fabric
Fig. 2 – Even Weave Linen
(Figures 1 and 2 show how one cross stitch is worked on each type of fabric.)
Threads
The most popular thread used in cross stitch is 6-stranded cotton. The main producers are DMC and Anchor. A single stranded thread called flower thread can also be used but it is not so versatile as 6-stranded thread and is not available in so many colours. Metallic threads, silk, perle and wool can also be used so long as they are compatible with the fabric.
The thread must be fine enough to pass through the holes in the weave without distorting them but thick enough to give the depth of colour. Double thread is used when working cross stitch. With such endless variety of threads and colours, designing your own projects becomes very exciting.
Each skein of stranded cotton is 8 meters long. The easiest way to use it is to cut each skein into 8 lengths and loop onto a card. Pull a single strand out and fold in half, then thread the two ends onto a needle. Used in this way leaves a loop for easy fastening and the ideal length to work with. [See: Starting to Stitch.]

Needles
Tapestry needles are generally used for cross stitch. They have a blunt end to avoid splitting the treads and a large eye to accommodate the thread. Sometimes it may be necessary to use sharp pointed needles to pierce the fabric.

Working with a Frame
Although a frame is extremely useful, especially for beginners and large pieces of work, it is not absolutely necessary when working on small designs. However, it does help to keep an even tension while you work.
A circular frame is suitable for smaller pieces of work and consists of two rings, which fit inside each other. They can be made of wood, which has a screw to tighten the outer ring to hold the fabric in place (see fig. 4), or a metal spring, which sits inside a plastic outer ring .
A square rotating frame can be hand held or attached to a stand and comes in several different sizes and can also be used with a stand. (See fig. 5) The fabric is tacked onto the tape fixed to the rollers and then rolled up as you work. This type of frame is best for large projects.

Fig. 4
Fig. 5
Reading a Chart
Some designs are illustrated in colour but the majority come with symbols and a key to the threads (see fig. 6). Each square represents one stitch and each thread colour is given a different symbol. The centre lines are indicated as well as each set of 10 squares.
Back stitches are shown by straight lines on the chart and by in the key.

Fig. 6
Starting to stitch
Firstly overcast the edges of the fabric to stop it fraying. Find the centre of your fabric by folding it in half each way along the straight of the threads, then tack a coloured thread to mark the centre lines (see fig. 7). Using these lines and the centre marks on the chart as a guide, carefully count from these lines to find the point where you wish to start stitching. It is a matter of preference where you start but make sure to take care to check your counting from time to time. There is nothing worse than finding you have spent hours stitching in the wrong place.

Once your needle is threaded (see fig.3), start stitching by bringing the needle up from the reverse side leaving the loop of thread underneath. Take the needle down to the reverse and through the loop. This is a neat way to secure the thread. Never use a knot to fasten as it may show through your work. When you have finished a section of stitching, weave the thread through the back of stitches and cut off.
Working cross stitch
As you stitch it is important to keep the crosses worked in the same direction otherwise the colours will shade differently. In some advanced designs the stitches are worked in different directions to give shading to the work but this is not advisable for beginners.) The work can be turned to make stitching easier but care must be taken to keep the stitches even. Do not pull the threads too tightly.
Although it is not always necessary to use back stitch in all designs it does tend to give a more finished appearance to the work, especially if you wish to create curves. It can be used to outline cross stitches or can be used on its own with great effect.
Single stitches are used for small areas of the same colour. Lines of stitches are used for speed and filling large areas of the same colour. (See figs. 8 & 9) Back stitch is used to outline shapes. (See fig.10)
These instructions are for guidance and you will soon find out the way you prefer to stitch.


Finishing
If you need to wash the finished work use hot water and a little mild washing powder or liquid, not detergent. Rinse well until the water runs clear.
Iron while damp on the wrong side over a folded towel and under a tea towel, until dry. Washing will improve the appearance of your work and will not harm it.
Unless you are very skilled it is probably best to have your work professionally framed but it is advisable to lace your work onto an acid free backing board before framing as this will hold it firmly in place.
Decide on the size of your picture and cut a piece of 2oz wadding slightly smaller than the picture size. Then decide on the overall size of your picture frame and cut a piece of backing board to that size.


